The Problem with Optical Media (CD & DVD)
Even though “digital transfer” sounds new, the concept has been around for a long time now. Writable discs became available in the year 2000, so the nascent digital transfer business grew up around that format, copying VHS and home movies to DVD for thousands of clients. And about that same time people started making their own CDs with the then-new CD burner in their computer.
That was over 20 years ago!
But there’s a time bomb ticking inside every writable disc in your closet. Here’s the problem:
DVDs and CDs are a sandwich. Between two layers of plastic, there’s a substrate that contains the data. In pre-recorded “manufactured” (Hollywood movie) discs you would buy at the store, that substrate is aluminum, with physical indentations (aka "pits") that comprise the digital data. Manufactured discs can last 100 years of more, but not so "writable" discs. In DVD-R, DVD+R, DVD-RW, DVD+RW, and writeable CD and BluRay, the middle of the sandwich is an organic dye layer. To write content to a disc on your computer or a DVD recorder, a powerful laser zaps the organic dye, leaving a dark spot, not a pit, to record the data. That’s why a writable disc drive is called a “burner.”
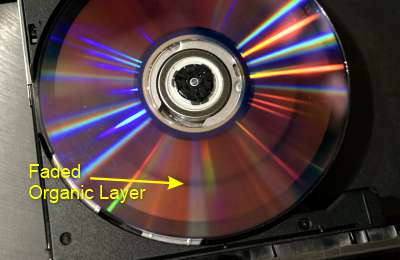 As with all things organic, however, this layer is not permanent. The layer can fade, grow fungus, or develop blank patches, depending on the quality of manufacture. Sure, some disks will last a long time, but others, even from good brands, have been known to develop problems after a very short time. (Illustration shows dark stripe where the disc faded, producing a glitch in playback.)
Net result, manufacturers say common writable discs are only good for about 10 years. (Premium "archival" discs may last longer.)
And then there’s the risks involved in disc storage and handling. Scratches, especially those made by faulty DVD/CD players, can render a disc unreadable. And if someone sits on one and cracks it, game over. (Never place a cracked disc in a player. It will fly apart, destroying the player!)
If you had digital transfers made 10 years or so ago on optical media, you’re going to want to preserve that investment – ESPECIALLY if you threw away the source tapes or films.
DIY Data Disc Backup (CD or DVD)
If you have an old data CD or DVD with just files on it, copying those is easy. Just load the disc into your computer's optical drive, view the contents, and copy them to yoru hard disk or portable backup drive. Then you can burn them to another disc if you prefer to keep your data backup on disc. (Note that if you copy files from optical media to a hard drive, they will retain their "read only" attribute. You may have to change that attribute before working with the files.
Set-top playable CD audio discs and DVD video discs work differently:
DIY Video DVD Backup
I’m going to give away a trade secret. You can back up your DVDs at home with just a PC or Mac and an optical DVD drive. You can do it right now without any special software. You just need a big hard disk or flash drive:
- Insert the disk into the optical drive on the computer.
- If the DVD player app opens, close it.
- On PC, open your “This PC” folder, then right click the DVD drive and choose “Open.” On a Mac, open the disk in Finder.
- You’ll find two folders on every set-top playable DVD, “AUDIO-TS” and “VIDEO-TS.” Create a folder on your hard drive, or insert an external drive, and just copy these folders to your destination. Because all files are named the same on DVDs, you’ll need to create a folder with a unique name for each disc you’re backing up. Be sure your destination has enough space; each single-layer DVD can have up to 4.7 Gigabytes of data. Double-layer DVDs can have over 9GB. Do the math and check available space.
- Once the contents are copied, BACK UP those folders to yet another external drive or flash drive. You cannot have too many backups.
NOTE: This will not work for commercial DVDs. While the file structure is the same, copy protection will prevent usable copies from being created.
If the computer has a licensed DVD player app, you can play the files directly. You can open the Video-TS folder and launch any of the .VOB files to watch them in the media player app.
To recreate the disc for set-top-box play, you will need to use a DVD burning software package, such as Nero. It will be able to write the contents of the disc to a fresh, blank disc. You can also use Nero or other similar software to copy one disk directly to another without first copying everything to your hard drive.
To make the extracted video work for file sharing or modern media players they have to be converted to the MP4 (h.264) format or another format compatible with your media player. That will require special video conversion software. There are several free or paid apps available for that purpose on your app store. Most DVD burning software will also convert formats.
Audio CD Backup & Extraction
If you have irreplacable content on a writable CD, it too is at risk. With CD burning software you can make a copy of the disc and you'll be good for the time being. But the audio files are formatted in a way that cannot be read by normal media players.
The process of extracting audio files from CD is called to "rip the CD." RIP doesn't mean "rip off," it means Raster Image Process. You can do that in Windows Media Player or iTunes. Here's how to RIP a CD in Windows Media Player.
Once ripped, you can convert the files to a compressed format within those programs for use in media players.
Data CD/DVD Extraction
If you simply have data files burned to a CD or DVD, it's really simple. Just load up the disc and copy the contents to a folder on your hard disk or to a flash drive. Note that whenever you copy from an optical disc, the files retain the "read only" attribute. In order to edit the files, you'll have to change the attribute using file management tools in your operating system.
The Professional Alternative
So, we just pulled back the curtain on how to back up and preserve your DVD collection. Be forewarned, if you want to DIY, it's complicated and there's a learning curve. But we have an alternative:
Bring your discs to Advent Digitizing.
We have the technology to safely extract the contents* and either burn new, fresh DVDs, or transcode and deliver your content on flash drive, where you can then back it all up to your computer and share it with your family or friends.
Don't wait. Your DVD clocks are ticking.
Start Here to preserve your DVDs
*Not a data recovery service. Discs must be playable.