SAFETY FIRST – BACKUP YOUR FILES
If you used Advent Digitizing for your digital transfers, you received your files on a flash drive or portable hard disk. If we provided DVD or CD copies, your master files are on the flash drive you also received.
We highly suggest the FIRST thing you do is to copy these files to a desktop computer - and then back up the computer! Flash drives can fail, so your best defense is to copy the files in two or more places. That means copying them first to a folder on your computer's hard drive, and then copying them (along with the rest of your data) to another external drive. Otherwise, if a lightning strike toasts your computer, a ransomware attack happens, or your flash drive gets run over by a truck, you are protected. Don't skip this step!!!
Copying your files from a flash drive is easy:
- Just insert the drive into a USB port.
- A folder will appear on your desktop.
- Copy/Paste or Drag & Drop the files to a folder on your computer's hard drive (typically "Pictures," "Music" or "Videos."). We recommend using subfolders to organize your files.
- Remove your flash drive and store it somewhere safe.
- Start a backup to of your media (or whole computer) to another hard disk or flash drive.
It's also a good idea to use "offsite backup." The cheap way is to make a copy of your valuable content and have someone store it at their place. Or sign up with a cloud backup service, which will automatically back everything up on the Internet. That way if the house burns or someone steals everything, all is not lost.
If file management is a mystery to you, ask the neighbor kid next door to explain it - or search for how to copy files on your operating system (Mac or Windows).
ABOUT FILE TYPES
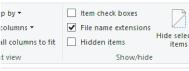 You may see several file types on your flash drive or data DVD. The file type (or “extension”) follows the dot (.) after the file name. If you do not see file types, click View in your File Explorer window, and check the box for Show File Name Extensions.
You may find these types of files:
- .mp4 – consumer grade video “release files” with compressed video, suitable for sharing or upload to YouTube or other video sharing service. Files may be HD (widescreen) or SD (traditional screen).
- .AVI, .MTS, .M2TS, .MPG, MOV – Pro grade video “source files” from which the MP4s are made. These can be used for future editing or creating DVD.
- .JPG – High quality compressed still image "release files."
- .ARW, .RAW, .TIF, .PNG, .PSD – Pro grade still image formats that can be used for enlargements or serious cropping.
- .ISO – an “image” file of the contents of a DVD or CD. Duplicate discs can be created from ISO files with many disk burning software titles.
- .NRG - an image file specific to the Nero disc burning software (typically used for audio CD images). Using Nero you can burn duplicate discs from this file.
- .MP3 - consumer grade digital audio "release files" with compresed audio, suitable for sharing or upload to portable music player
- .WAV - uncompressed digital audio "source files" suitable for making CDs, editing or critical listening.
If you put a video DVD in your computer and open the file structure you will find:
- .VOB - the video "objects" that play. These are MPEG-2 standard-definition files that contain your program.
- .BUP, .IFO - these are information files required for the set-top DVD player to work. A DVD authoring program creates these which is why DVD is more expensive
- Any of the other formats (above). DVD is capable of storing data alongside player-compatible video, and sometimes we can package the other formats alongside the video.
FILE RENAMING
Most of the time, the digital files will have cryptic names, "reel 1, reel 2, etc.," based on the sequence you provide on your markings. As long as the files are not on optical media (CD or DVD), they can be renamed. Remember, however, if you rename a file on your computer, it will not change the name on the flash drive.
There are three ways to rename a file on a PC. PICK ONE:
- In the File Explorer Home ribbon, click “Rename”
- Right click the file and click “Rename”
- Do a “slow double-click” (click once, then click again in short order, but not as quickly as a normal double-click) to enable renaming.
With any of these options, the filename will be highlighted in blue, and you can type in the new file name.
To bulk-rename many files at the same time:
- Select the files you want to rename, either:
- click the first one, shift+click the last one, so all are highlighted
- “Lasso” the file names by clicking and dragging in the window
- Turn on “Item Check Boxes” in the View tab and then check the boxes for the ones you want, or the checkbox at the very top to select all
- Type Ctl+A to select all
- Right click on the first file
- Type the name you want to give it – omit any numbering
- Hit Enter and all the files will take on the same name with a number in parenthesis (#)
NOTE: If you are importing pictures into another program, some applications require renaming files with leading zeroes, otherwise it sorts 1, 10, 11, 12, … 19, 2, 20, 21….
REMEMBER: Renaming files that have been copied to your computer do NOT change the filenames on the release disk. Also renaming the release files does NOT change the names of the source files.
IF YOU COPY FILES FROM A CD OR DVD, the files will have the Read Only attribute, and you will be warned they cannot be renamed. Right click the file, choose “Properties,” and uncheck the “Read Only” box. Then you can rename the files.
ABOUT SHARING FILES
STILL IMAGES: Most JPG images can be freely shared in email or on social media. If you ordered the professional files, keep those as backup and for image processing. They're too big to share.
VIDEOS: Most videos are too large to share via email, and they're very long. If uploaded to a Web service such as YouTube, it may take a very long time depending on your Internet speed - and you may not want your friends to see everything that's on the reel. See below about editing. While YouTube is free, we have found Vimeo to be a more suitable platform for private video sharing.
If you want to share movies on YouTube without them being indexed for the whole world to find, choose “Unlisted” in the privacy settings. That way only people with the link can see them.
SHARING OF COPYRIGHTED MATERIAL (copies of store-bought records, videotapes, CDs, etc.) IS STRICTLY PROHIBITED BY US COPYRIGHT LAW. YouTube can detect copyrighted content, and will either insert ads in your video, or block the content. YouTube has even been known to flag covers of popular music recorded by local artists - even an organ prelude for a wedding. A radio playing music in the background is also technically a copyright violation.
EDITING VIDEOS
You may edit your videos with any free or paid consumer or pro video editing software compatible with your computer. If you requested "Source Files," they are locaed in a folder called "Source." COPY THEM TO YOUR HARD DISK PRIOR TO EDITING so that your originals on your release media are not altered, and your playback will be smoother. Open the file and either select sections to export or delete parts you don’t want. Use the software’s export command to save the edited clip in the .mp4 (or h.264) format, then you can share the edited video online or via flash drive.
If you would like us to edit the files for you, create a list of clips to make by making note of the time (displayed by your media player) for the START and END of each clip, and whether clips are to be combined as one or saved separately. It also helps to have a description or audio cue of exactly where you want it to start and end. We can work from your archived footage on file, so the release media is not needed for us to edit. We’ll quote a cost for the editing work when we have your list.
TO PLAY ON A TV
Most newer HDTVs have a USB port and a built-in media player, accessed from the TV remote or menu. Insert the flash drive into the USB port on the back or side of the set, then using the TV remote, click "Source" or "Input" and choose USB. You may have the option to play videos, JPEG stills, or both. Check your TV's instruction manual for details.
The master release drive (if formatted for large files) and pro source formats may not be compatible with all TVs, so we recommend copying the MP4 release files to another Flash drive for playback on the TV. Refer to your TV’s manual for instructions on using the built-in media player.
MAKING DVDs/CDs
If you feel so inclined, you can make a DVD from the files you receive. If you simply burn the files to a DVD, you are making a “DVD Data Disk,” which is playable on another computer, but not a DVD player. Making a DVD that works on a set-top player is not as simple as burning the files to disk. The process requires a special “authoring” program to create a set-top-box-compatible file structure. Many DVD burning software titles, such as Nero, offer DVD authoring functionality, so you’ll need to acquire the proper software. Note that DVD can only hold 2 hours of video, so you may want to edit your videos prior to making a DVD – or else you’ll need to make a lot of disks if you have a lot of tapes! For best results, Source Files should be used for DVD.
Likewise with making audio CDs. If you simply burn audio files to a CD they will not play in a standard CD player. Within most CD burning apps there is a method to make an audio CD from Source Files we provide. Refer to your software's instructions.
We offer DVD and CD authoring services. If you would prefer some of your videos or recordings be placed on optical disk, give us details and we’ll prepare a quote, even after we make the initial transfer. If done quickly enough, we will not need the source tapes or films to make the DVD. Note that our copies of the source files are scheduled for deletion 90 days after delivery. Unless the archive option was chosen, we may require files in your possession to do any editing or authoring after 90 days.
(We do not provide technical support for DIY authoring of disks or using editing software. Refer to the software manual or help files for training and support.)
THE ORIGINALS
DON'T throw away the originals! If they survived this long they'll probably survive another 50-100 years, and by then a new method of digitizing may be developed, and it always looks and sounds better to digitize from an analog source. Of course if the films or tapes are badly faded or damaged, you can probably let those go. Also if any of the content is copyrighted, you need to have posession of the original sources for personal use of the transferred files.
Click Here to start digitizing!